
Connect Letters inside Circle Container in Flutter
— 9 min read

Greetings to the amazing Flutter community! Have you ever played the famous game Word Of Wonders and found yourself wondering: How could I implement the feature where you connect all the letters inside the circle? How do you place all those letters inside the circle, and how do you create a word with its values? Well, I recently embarked on a mission to solve this puzzle, and let me tell you, it's been quite a challenge to find resources on the web. It's one of those undocumented features that seem like hidden gems waiting to be unearthed. Today, I'm very excited to share such a discovery with you, and the best part is that we're diving straight into the code, no packages, no setup needed. Buckle up as we embark on a journey to unravel this mystery together, empowering you to add a unique feature into your next Flutter project. Let's dive in!
Code
Our journey through this Flutter adventure will be divided into three parts, each focusing on a fundamental aspect of our circular letter arrangement feature. Firstly, we'll embark on the quest to place the letters inside the circle with precision. Next, we are going to explore how to draw lines between the letters we connect and how these lines follow our finger across the circle until we meet the next letter. Finally, we will show the result of the word we created by connected these letters, at the top of the screen.
Crafting the Circular Arrangement
To start, we'll lay the foundation by creating a Container that will serve as the base for our feature. This container needs to be a perfect square so when we add the BoxDecoration, it transforms seamlessly into a circle. Next, we'll introduce a Stack widget, a versatile tool in Flutter's arsenal, to overlay our letters on top of the circular container. Finally, we 're ready to add the positions, based on the number of letters we try to place inside the circle.
Setup Constant Values
const double circleSize = 300;
const double boxSize = 50;

const Color primaryColor = Color.fromARGB(255, 166, 185, 204);
const Color highlightColor = Color.fromARGB(255, 95, 150, 187);
const Color textColor = Color.fromARGB(255, 26, 67, 94);
const Color whiteColor = Color(0xffFFFFFF);
Circle Container with Stack
final key = GlobalKey();
List<Widget> stackLetters = [];

Container(
    decoration: const BoxDecoration(
        shape: BoxShape.circle,
        color: primaryColor,
     ),
    width: circleSize, // same value with height
    height: circleSize, // same value with width
    child: Stack(
        children: [
            Stack(
                key: key,
                children: stackLetters,
            ),
        ],
    ),
),
The stackLetters, is a List of Widgets, but not any type of Widget. We need to create our own Box Widget, inside of which, every letter will be placed.
Create Letter Widget
This is how the letter will look like inside the circle.
class BoxDetails extends StatelessWidget {
  final String letter;
  final Alignment position;
  bool isSelected;

  BoxDetails({
    Key? key,
    required this.letter,
    required this.position,
    this.isSelected = false,
  }) : super(key: key);

  @override
  Widget build(BuildContext context) {
    return Align(
      alignment: position,
      child: Container(
        decoration: BoxDecoration(
          shape: BoxShape.circle,
          color: isSelected ? textColor : highlightColor,
        ),
        alignment: Alignment.center,
        width: boxSize,
        height: boxSize,
        child: Text(
          letter,
          style: TextStyle(
            fontSize: 20,
            fontWeight: FontWeight.bold,
            color: isSelected ? whiteColor : textColor,
          ),
        ),
      ),
    );
  }
}
But, it needs to be inside this LetterBox, so we can track the position.
class LetterBox extends SingleChildRenderObjectWidget {
  final int index;

  const LetterBox({required Widget child, required this.index, Key? key})
      : super(child: child, key: key);

  @override
  LetterBoxProxy createRenderObject(BuildContext context) {
    return LetterBoxProxy(index);
  }

  @override
  void updateRenderObject(BuildContext context, LetterBoxProxy renderObject) {
    renderObject.index = index;
  }
}

class LetterBoxProxy extends RenderProxyBox {
  int index;
  LetterBoxProxy(this.index);
}
As you can see, to achieve precise placement of each letter within the circular arrangement, we rely on the Align widget. By encapsulating every letter within an Align widget, we gain the ability to define its exact position within the circle. Take a good look at the images below, to better understand how the positioning works with and Align Widget and what we try to accomplish.
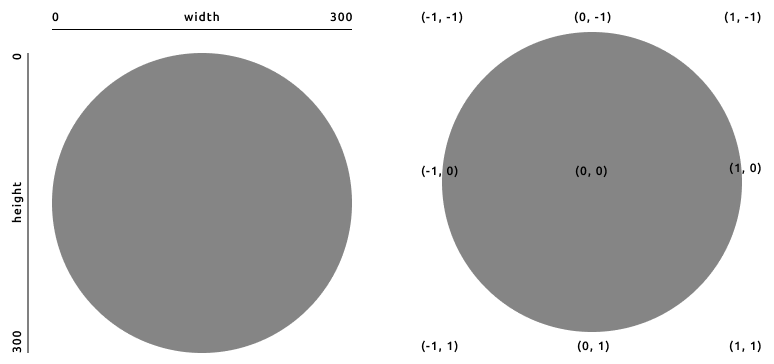
When utilizing the Align widget to position elements within our circular arrangement, we're presented with a unique opportunity to leverage the widget's alignment parameters, which operate on a scale ranging from -1 to 1. Imagine the center of our circular container as the origin point (0, 0) of our coordinate system. As we move away from the center towards the right, the x-coordinate values increase, reaching a maximum value of 1 at the far-right edge of the container. Conversely, as we move towards the left, the x-coordinate values decrease, reaching a minimum value of -1 at the far-left edge. Therefore, when we specify the position of a letter using the Align widget, we don't directly reference pixel values such as x=300 (assuming 300 is the size of our circular container). Instead, we express the position relative to the container's dimensions using the range of values from -1 to 1.
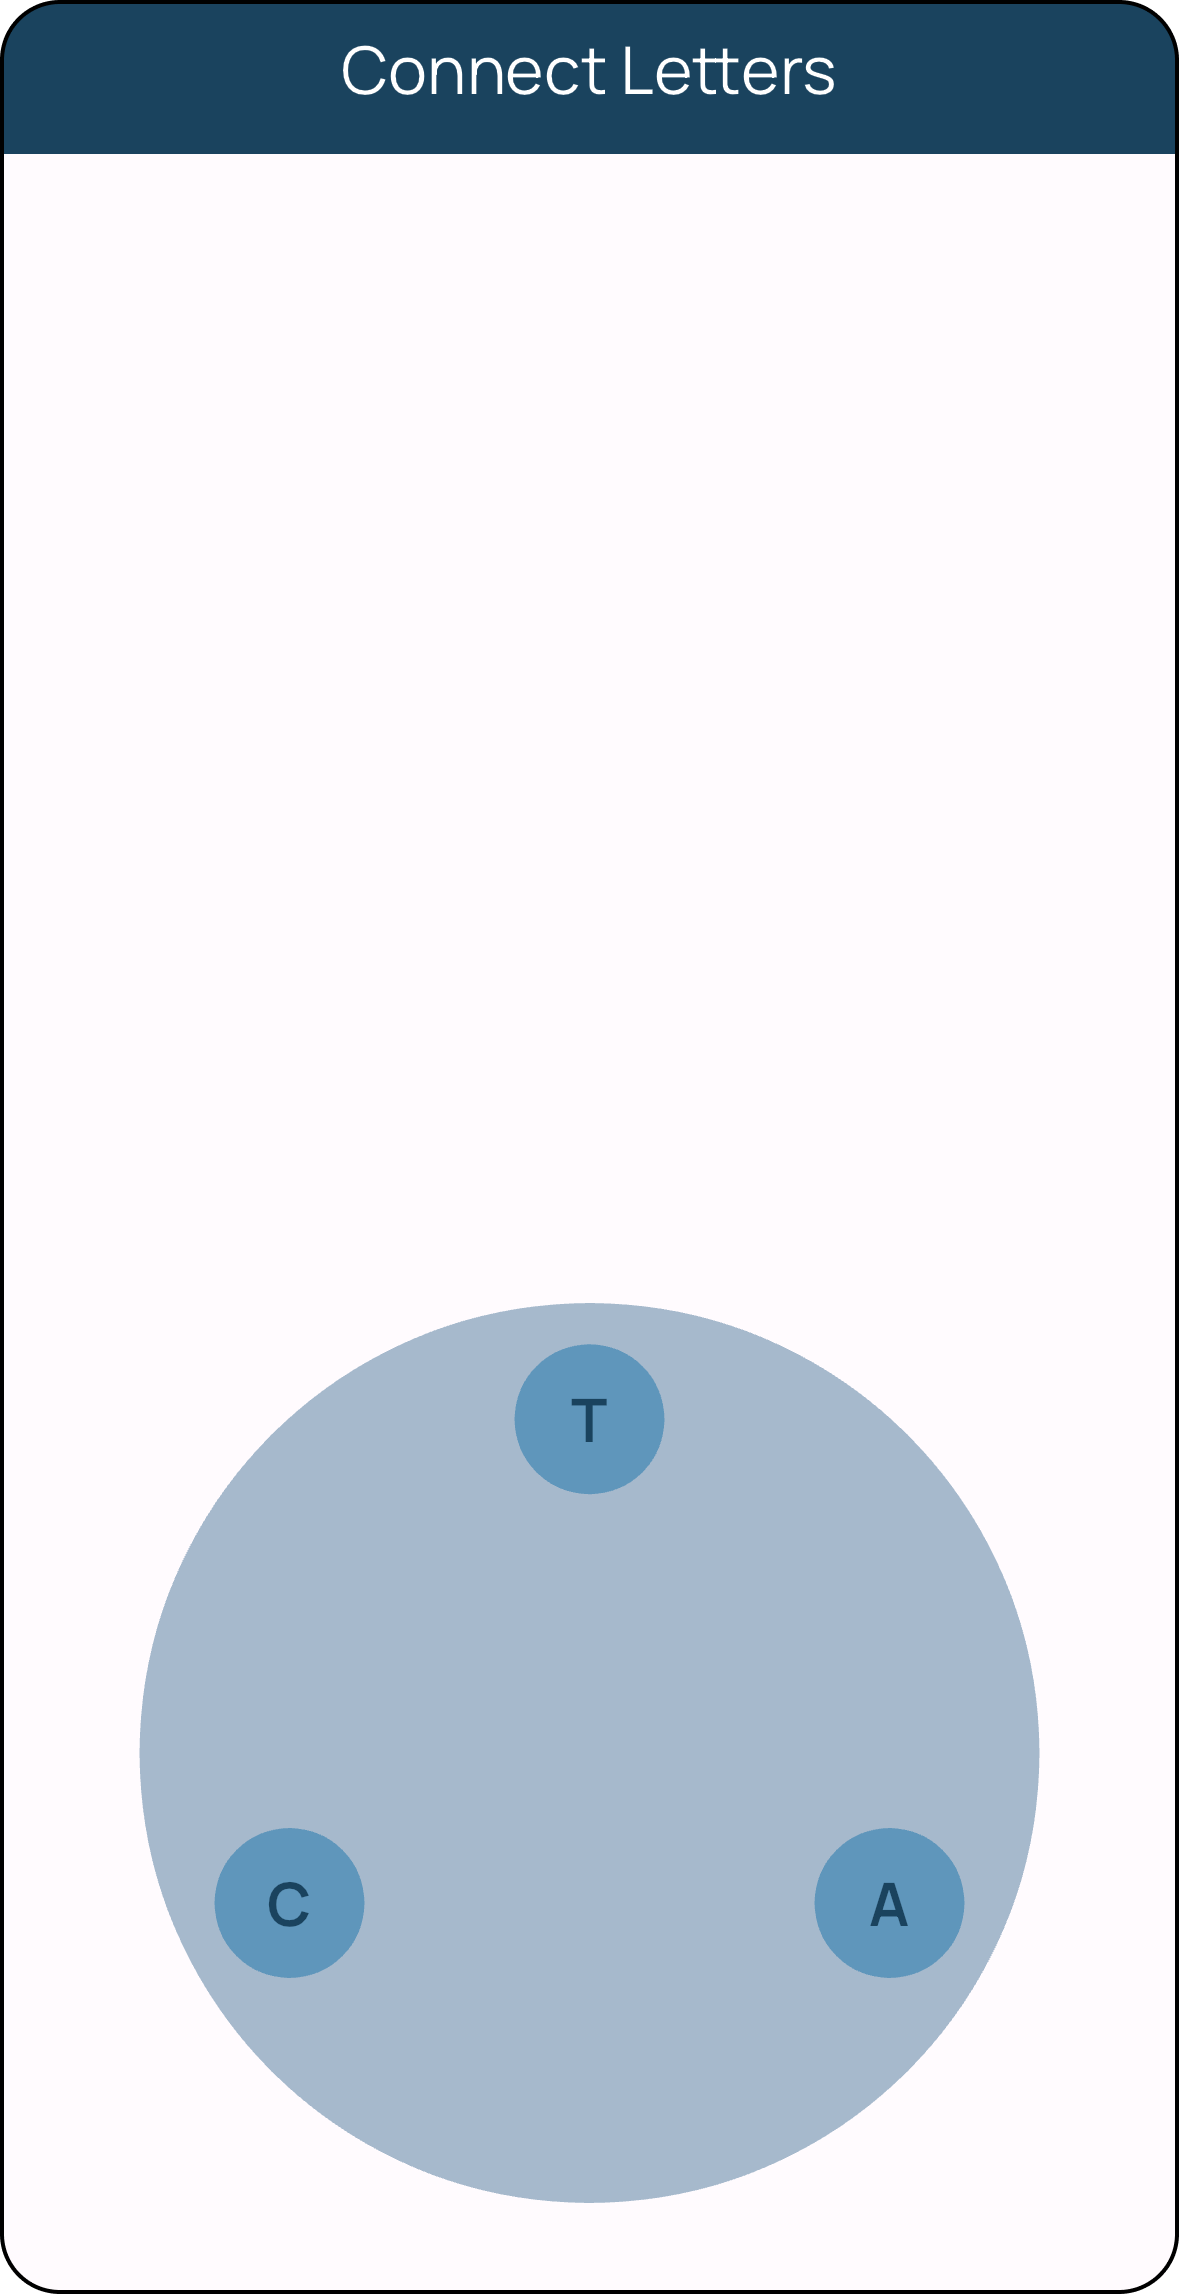
Initialize Letters
To gain a deeper understanding of the positioning, let's explore a simple example with three letters.
// Positions

[
    [-0.8, 0.4],
    [0.8, 0.4],
    [0, -0.89],
]
The function generateLetters utilizes these positions to dynamically generate widgets representing each letter within the circular arrangement. The value of stackLetters that we use in the previous container, comes from this:
List<Widget> generateLetters({
  required String word,
  required List positions,
}) {
  return List<Widget>.generate(
    word.length,
    (index) => LetterBox(
      index: index,
      child: BoxDetails(
        letter: word[index],
        position: Alignment(
          positions[index][0],
          positions[index][1],
        ),
      ),
    ),
  );
}
And the result we get, looks like this:
Connecting the Dots: Creating Lines
With the foundational elements of our circular arrangement in place, we now turn our attention to a more intricate challenge: connecting the letters together. How do we seamlessly link each letter to its neighbors, and how do we track the value of the LetterBox that we touch? Let's answer these questions.
Track Finger
First of all, we need to track whenever the user touch the circle container and then drags the finger around the circle. For this feature, we will use the Listener Widget:
Listener(
  onPointerMove: (event) {
    // Function for tap
  },
  onPointerDown: (event) {
    // Function for drag
  },
  onPointerUp: (event) {
    // Function for clearing the results
  },
  child: Container(
    decoration: const BoxDecoration(
      shape: BoxShape.circle,
      color: primaryColor,
    ),
    width: circleSize,
    height: circleSize,
    child: Stack(
      children: [
        Stack(
          key: key,
          children: stackLetters,
        ),
      ],
    ),
  ),
),
The function that we will use for onPointerMove and onPointerDown, is the same for both scenarios.
Custom Painter
Whenever we touch a letter inside the circle, we want to create a line that will start from the center of this letter, and it will follow our finger until we meet the next letter. Those lines, will look something like this:
class LinePainter extends CustomPainter {
  Offset? startPosition;
  Offset? endPosition;

  LinePainter({required this.startPosition, required this.endPosition});

  @override
  void paint(Canvas canvas, Size size) {
    final paint = Paint()
      ..color = textColor
      ..strokeWidth = boxSize / 6;

    if (startPosition != null && endPosition != null) {
      canvas.drawLine(
        startPosition!,
        endPosition!,
        paint,
      );
    }
  }

  @override
  bool shouldRepaint(LinePainter oldDelegate) {
    return oldDelegate.startPosition != startPosition ||
        oldDelegate.endPosition != endPosition;
  }
}
Initializing all the lines is a straightforward process, but it's essential to remember that the number of lines is always one less than the number of letters.
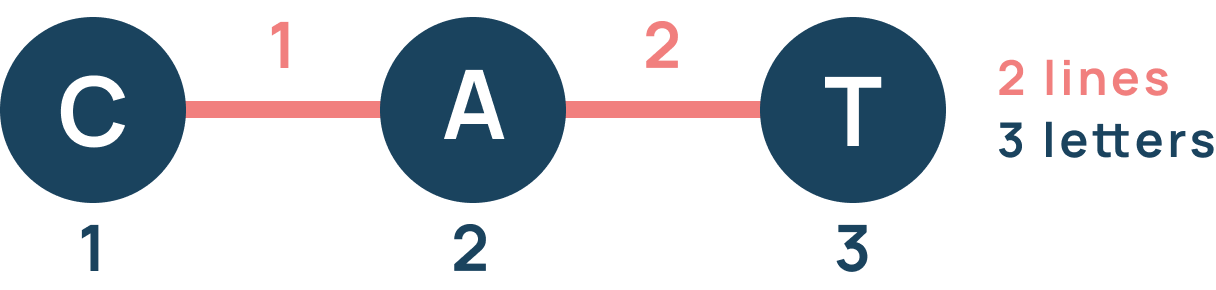
List<CustomPaint> generateLinePainter({
  required String word,
  required Offset? start,
  required Offset? end,
}) {
  return List<CustomPaint>.generate(
    word.length - 1,
    (index) => CustomPaint(
      painter: LinePainter(
        startPosition: start,
        endPosition: end,
      ),
    ),
  );
}
We give the return value of generateLinePainter to the variable lineConnections, and the new Circle Container looks like this:
Container(
  decoration: const BoxDecoration(
    shape: BoxShape.circle,
    color: primaryColor,
  ),
  width: circleSize,
  height: circleSize,
  child: Stack(
    children: [
      ...lineConnections, // this is where we add the lineConnections
      Stack(
        key: key,
        children: stackLetters,
      ),
    ],
  ),
),
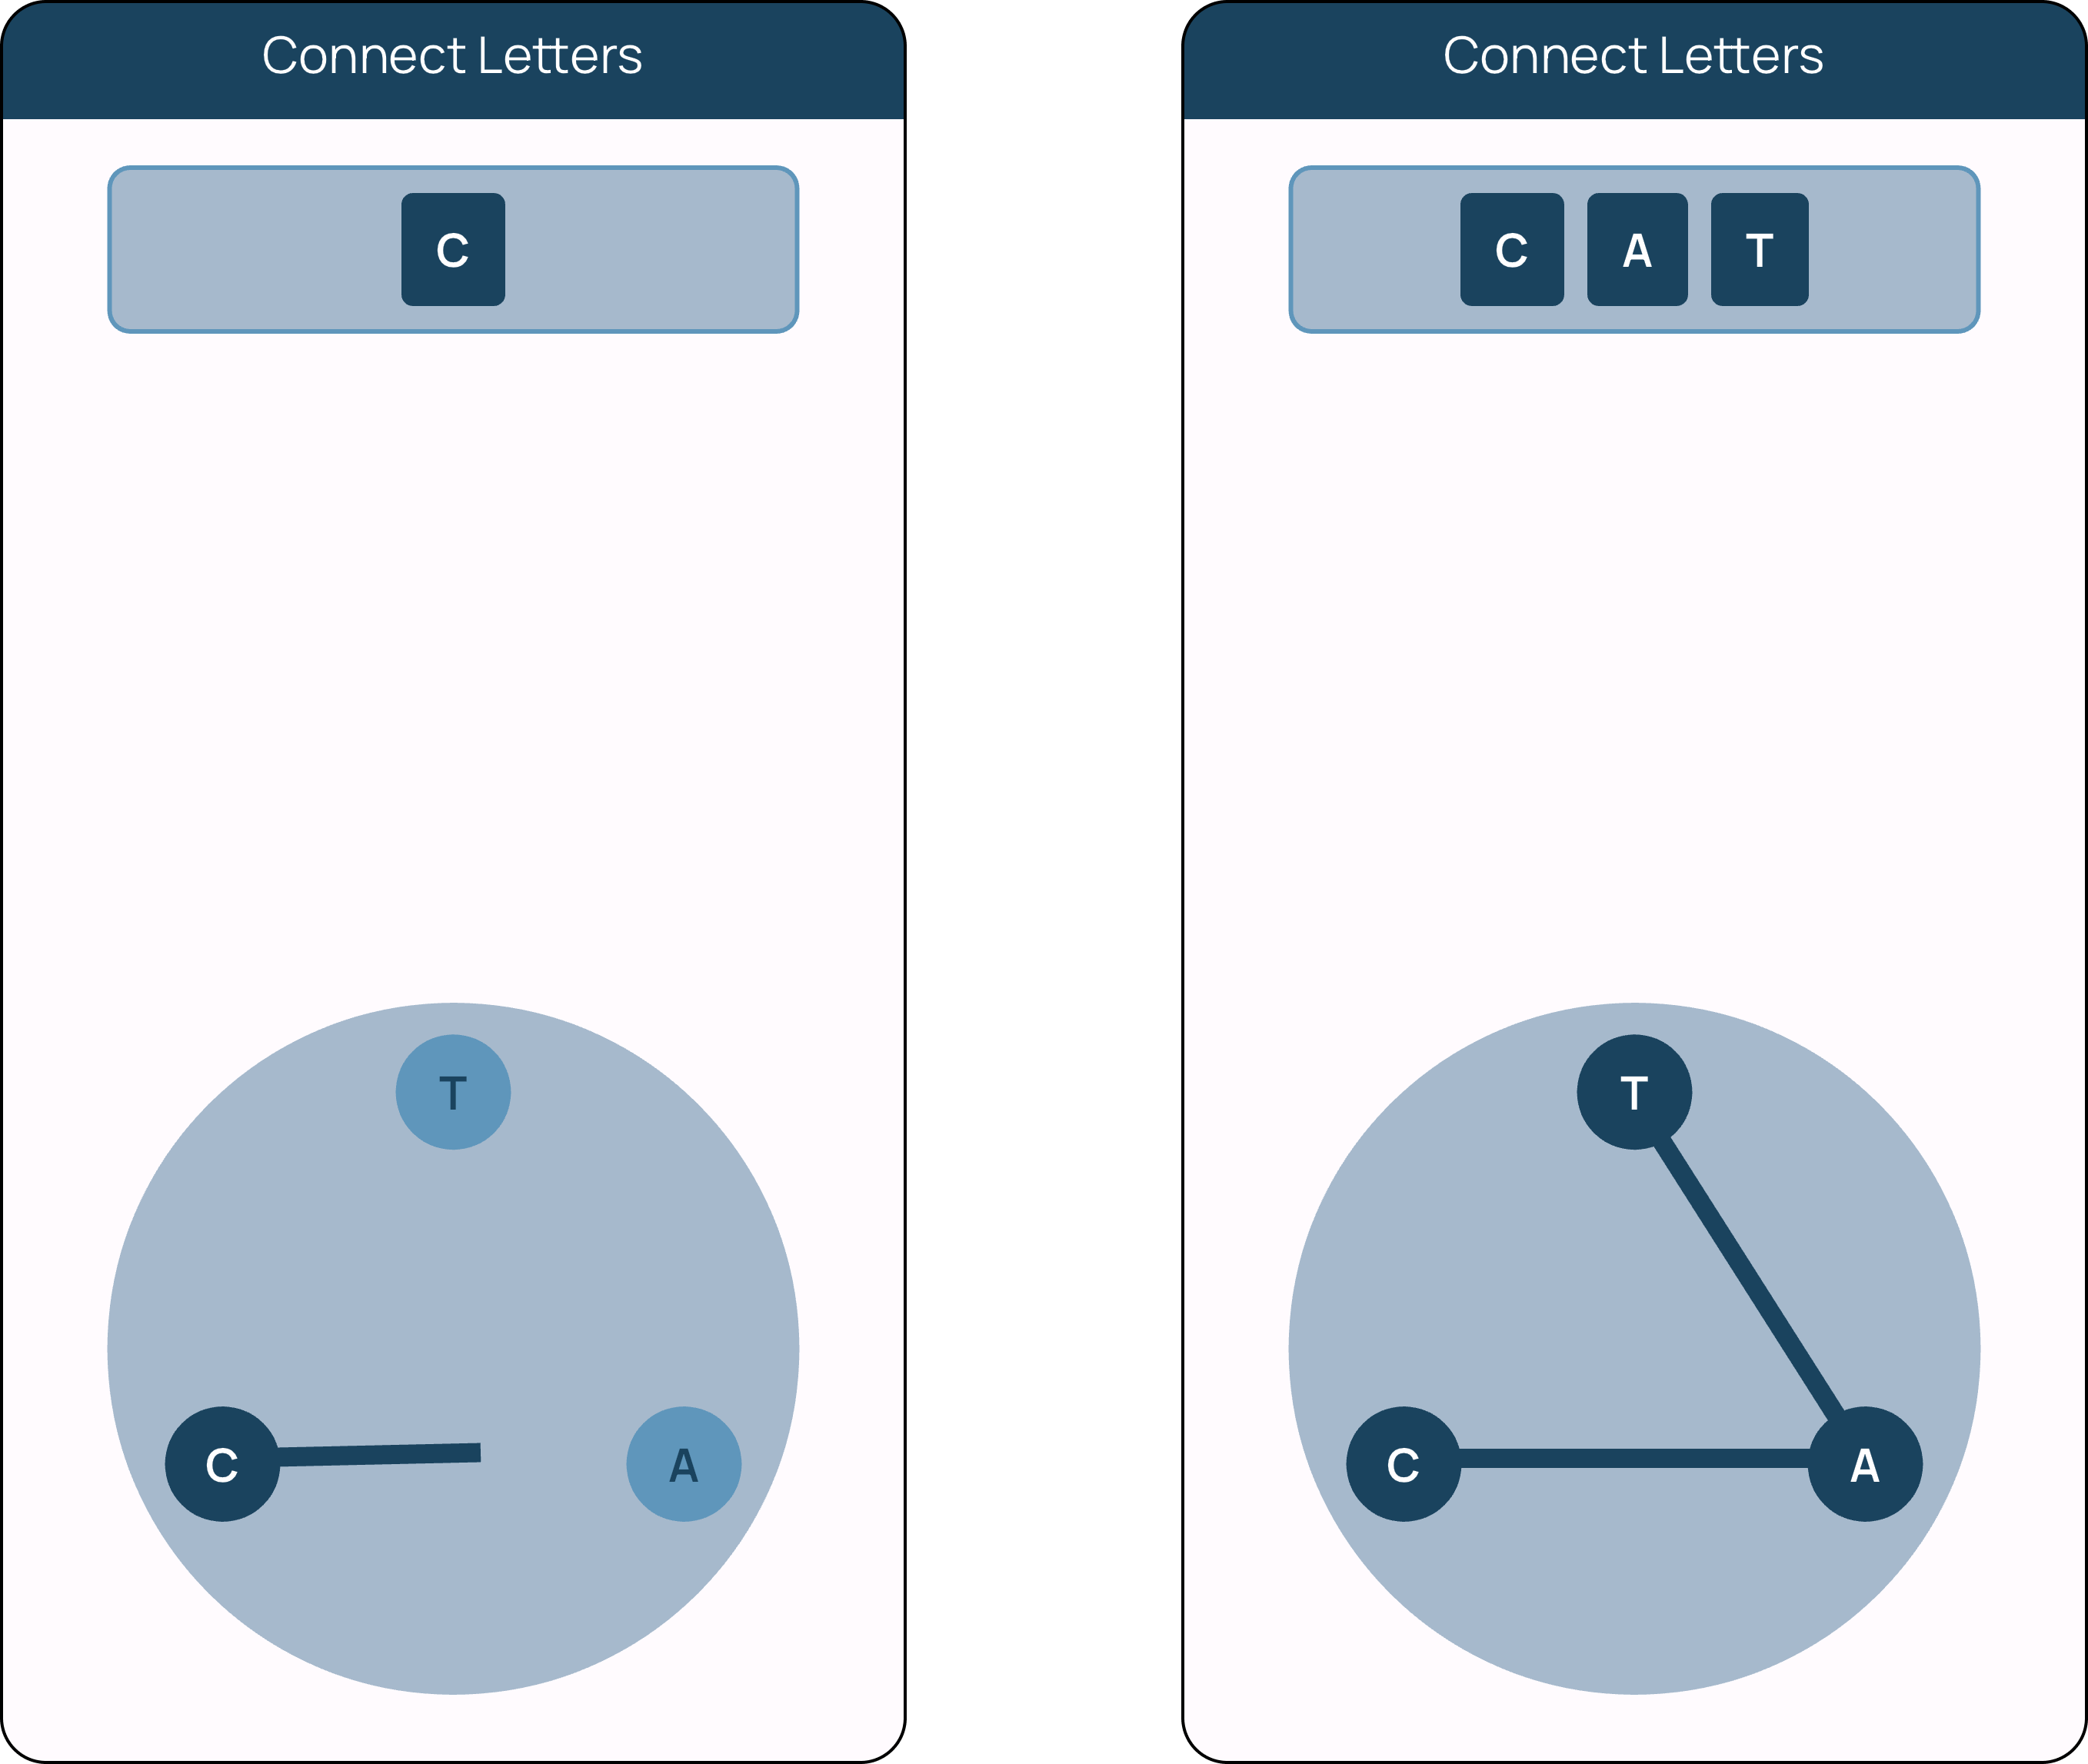
Displaying the Lines and the Result
Now that we set everything, we are ready to implement the function that run onPointerMove and onPointerDown.
  String chosenLetters = "";

  Offset? startPosition;
  Offset? endPosition;
  int count = 0;

  Set<LetterBoxProxy> trackTaped = <LetterBoxProxy>{};
  List startingPositions = [];

  List positionList = [];

  void tapAndHoverLetter(PointerEvent event) {
  // Get the local position of where the user tapped inside the circle container
    final RenderBox box =
        key.currentContext!.findAncestorRenderObjectOfType<RenderBox>()!;
    final result = BoxHitTestResult();
    Offset local = box.globalToLocal(event.position);

    // Set the end position of the line, to the local position of the finger inside the circle
    setState(() {
      endPosition = local;

      if (count != 0 && count < widget.word.length) {
        lineConnections[count - 1] = CustomPaint(
          painter: LinePainter(
            startPosition: startingPositions[count - 1],
            endPosition: endPosition,
          ),
        );
      }
      if (count > 1 && count <= widget.word.length) {
        lineConnections[count - 2] = CustomPaint(
          painter: LinePainter(
            startPosition: startPosition,
            endPosition: startingPositions[count - 2],
          ),
        );
      }
    });

    // This is where we check if the tracking meets a letter
    if (box.hitTest(result, position: local)) {
      for (final hit in result.path) {
        final target = hit.target;

        if (target is LetterBoxProxy && !trackTaped.contains(target)) {
        // Setting the starting position with the center of the letter we tapped on
          setState(() {
            startPosition = findCenterOfBox(
              x: positionList[target.index][0],
              y: positionList[target.index][1],
            );

            // Changing the color of the LetterBox
            stackLetters[target.index] = LetterBox(
              index: target.index,
              child: BoxDetails(
                isSelected: true,
                letter: widget.word[target.index],
                position: Alignment(
                  positionList[target.index][0],
                  positionList[target.index][1],
                ),
              ),
            );

            // Updating the LinePainter List
            if (count < widget.word.length - 1) {
              lineConnections[count] = CustomPaint(
                painter: LinePainter(
                  startPosition: startPosition,
                  endPosition: endPosition,
                ),
              );
            }

            // Crafting the word
            chosenLetters += widget.word[target.index];

            startingPositions.add(startPosition);

            count++;
            trackTaped.add(target);
          });
        }
      }
    }
  }
Finally, when the user is done creating a word, and he moves the finger out of the Circle Container, we execute the onPointerUp from the Listener Widget, which calls the function below:
// Clear chosen letters
void clearLetters() {
    setState(() {
        count = 0;
        startPosition = null;
        endPosition = null;
        stackLetters = [];
        lineConnections = [];
        trackTaped = <LetterBoxProxy>{};
        startingPositions = [];
        chosenLetters = "";
    });
}
Conclusion
And there you have it! You've delved into the challenge of creating a circular arrangement of letters in Flutter, from precise positioning to dynamic line drawing. By following this guide, you've gained valuable insights into implementing a Word of Wonders letter container clone but also gained valuable insights into Flutter development techniques. I encourage you to head over to the Github Repository, to explore all the parts of the code. Feel free to reach out if you have any questions or need further guidance. Wish you a wonderful day and happy coding !!

If you enjoyed this article and want to stay connected, feel free to connect with me on LinkedIn.
If you'd like to dive deeper into the code and contribute to the project, visit the repository on GitHub.
Was this guide helpful? Consider buying me a coffee!☕️ Your contribution goes a long way in fuelling future content and projects. Buy Me a Coffee.


