How to write LaTeX documents with Visual Studio Code on Mac
— 8 min read

I recall being in my third year of engineering school when my favorite teacher recommended LaTeX for our coursework. At that time, none of us had heard about it, and as our research began, many students quickly frowned upon the idea of writing code to create a PDF file. The memory of how everyone suddenly became a staunch supporter of Word, simply because they were reluctant to try something new, is still vivid in my mind.
Of course, being the nerd I was, and with the suggestion coming from my favorite teacher whom I greatly admired, I felt compelled to give LaTeX a try! I mean, having explored the world of coding since my teenage years, the idea of saying I created a PDF using code was kind of fascinating to me.

Table of Contents
- The Benefits of Using LaTeX
- Download and Install MacTex
- Install and Configure LateX Workshop in VsCode
- Configure Latex Workspace
- Install Latex Helper Extensions
- Create Your First LaTex Project with VsCode
- Conclusion
The Benefits of Using LaTeX
Using LaTeX has a lot of perks, especially if you're tackling academic work that includes lots of mathematical formulas, citations, and needs consistent formatting. Here is why it's great:
- Professional Look: Your thesis/paper/book will look really polished and meet the high standards required for academic work.
- Great for Math: Handles intricate mathematical notation much better than typical word processors.
- Automatic Formatting: everything from headings to footnotes looks consistent throughout your thesis, all without you having to tweak things manually.
- Streamlined Content Management: Organizing tables, figures, and references is much easier with LaTeX. It automatically updates citations and bibliographies throughout your document, saving you a ton of time.
- Highly Customizable: A wide range of available packages, help you tweak nearly every aspect of your document’s layout.
- Works with Version Control: Great for tracking changes, working with others, and backing up earlier drafts.
- Lets You Focus on Writing: Concentrate on the content of your writing without getting sidetracked by formatting issues.
- Preferred in Academia: Many academic journals and conferences favor LaTeX because of its precise and consistent formatting.
- Absolutely Free: Unlike some other software, LaTeX doesn’t cost anything.
- VsCode integration: Super easy, ready-to-go, integration with just a plugin installation.
⼻Download and Install MacTex
This is a very straightforward procedure, you just download and install the MacTeX.pkg from here, this might take some time as it is a big one...

Once it is downloaded, just fire up the installation and follow the instructions, you don't have to customize anything.
⼻Install and Configure LateX Workshop in VsCode
Here you might want to put on some gloves cause it's time to get your hands dirty!
Open up your VsCode ( I assume you have it installed already ) and press ⌘ + ⇧ + X. Now you have your extensions opened up. Search for Latex Workshop, the one we want is from James Yu.
Configure Latex Workspace
Press ⌘ + ⇧ + P and type workspace and choose Preferences: open workspace settings (JSON) or if you don't work with workspaces go to user settings. I like working with workspaces cause I keep extensions from getting entangled with each other. Now copy and paste the following snippet into your JSON file (inside the brackets {}).
"latex-workshop.latex.tools": [
	{
		"name": "latexmk",
		"command": "latexmk",
		"args": [
			"-synctex=1",
			"-interaction=nonstopmode",
			"-file-line-error",
			"-pdf",
			"-outdir=%OUTDIR%",
			"%DOC%"
		],
		"env": {}
	},
	{
		"name": "xelatex",
		"command": "xelatex",
		"args": [
			"-synctex=1",
			"-interaction=nonstopmode",
			"-file-line-error",
			"%DOC%"
		],
		"env": {}
	},
	{
		"name": "pdflatex",
		"command": "pdflatex",
		"args": [
			"-synctex=1",
			"-interaction=nonstopmode",
			"-file-line-error",
			"%DOC%"
		],
		"env": {}
	},
	{
		"name": "bibtex",
		"command": "bibtex",
		"args": [
			"%DOCFILE%"
		],
		"env": {}
	}
],
"latex-workshop.latex.recipes": [
	{
		"name": "pdfLaTeX",
		"tools": [
			"pdflatex"
		]
	},
	{
		"name": "latexmk 🔃",
		"tools": [
			"latexmk"
		]
	},
	{
		"name": "xelatex",
		"tools": [
			"xelatex"
		]
	},
	{
		"name": "pdflatex ➞ bibtex ➞ pdflatex`×2",
		"tools": [
			"pdflatex",
			"bibtex",
			"pdflatex",
			"pdflatex"
		]
	},
	{
		"name": "xelatex ➞ bibtex ➞ xelatex`×2",
		"tools": [
			"xelatex",
			"bibtex",
			"xelatex",
			"xelatex"
		]
	}
]
🗒️ Note: If you need to use the XeLaTeX engine, for example, to work with specific fonts, you should adjust your settings to ensure XeLaTeX is the first recipe listed in your configuration. This setup is necessary because VSCode's LaTeX Workshop will automatically use the first recipe in the list as the default for compiling your document, unless you specify otherwise.
Install Latex Helper Extensions
- LaTeX by Mathematic Inc: Latex language support for Visual Studio Code
- LaTeX Snippets: Useful Snippets for Latex
- Github Copilot: AI Pair programmer. Very helpful extension because it suggests new lines of code, like list items, it completes figures, mathematical equations, and many more.
Add LaTex to your ZSH Path
If you followed my instructions to the letter you should have this folder /usr/local/texlive/2023/bin/universal-darwin you can just:
ls /usr/local/texlive/2023/bin/universal-darwin
You should see a list of LaTeX-related files. If so, you're ready to add LaTeX to your ZSH path. Edit your .zshrc file by opening it in a text editor (here, we use my beloved nano):
    nano ~/.zshrc
    # include this line
    export PATH="/usr/local/texlive/2023/bin/universal-darwin:$PATH"
now finish up by running source ~/.zshrc. And you are ready to go! Now, LaTeX commands are available system-wide, streamlining your workflow and making LaTeX usage in any project much more convenient.
This step is very crucial because otherwise, your VsCode might not be able to find the files it needs to compile the latex project.
Create Your First LaTex Project with VsCode
Create a new folder that will include all your LaTeX projects, I named mine... 🥁🥁🥁 Latex. I am a simple man. Then inside the folder create a new folder named Test. Now load the Test folder to your VsCode workspace or whatever and create a new file named text.tex. Here is a starting snippet:
\documentclass{article}

\begin{document}
    This is a \TeX file made by \LaTeX.
    \begin{itemize}
        \item I kinda
        \item Like creating
        \item PDFs like that
    \end{itemize}

    % Add first newtons law (sum of forces = 0)
    \begin{equation}
        \sum F = 0
    \end{equation}

    % Github Copilot wrote the above ;)

\end{document}
And the final result! 🪄
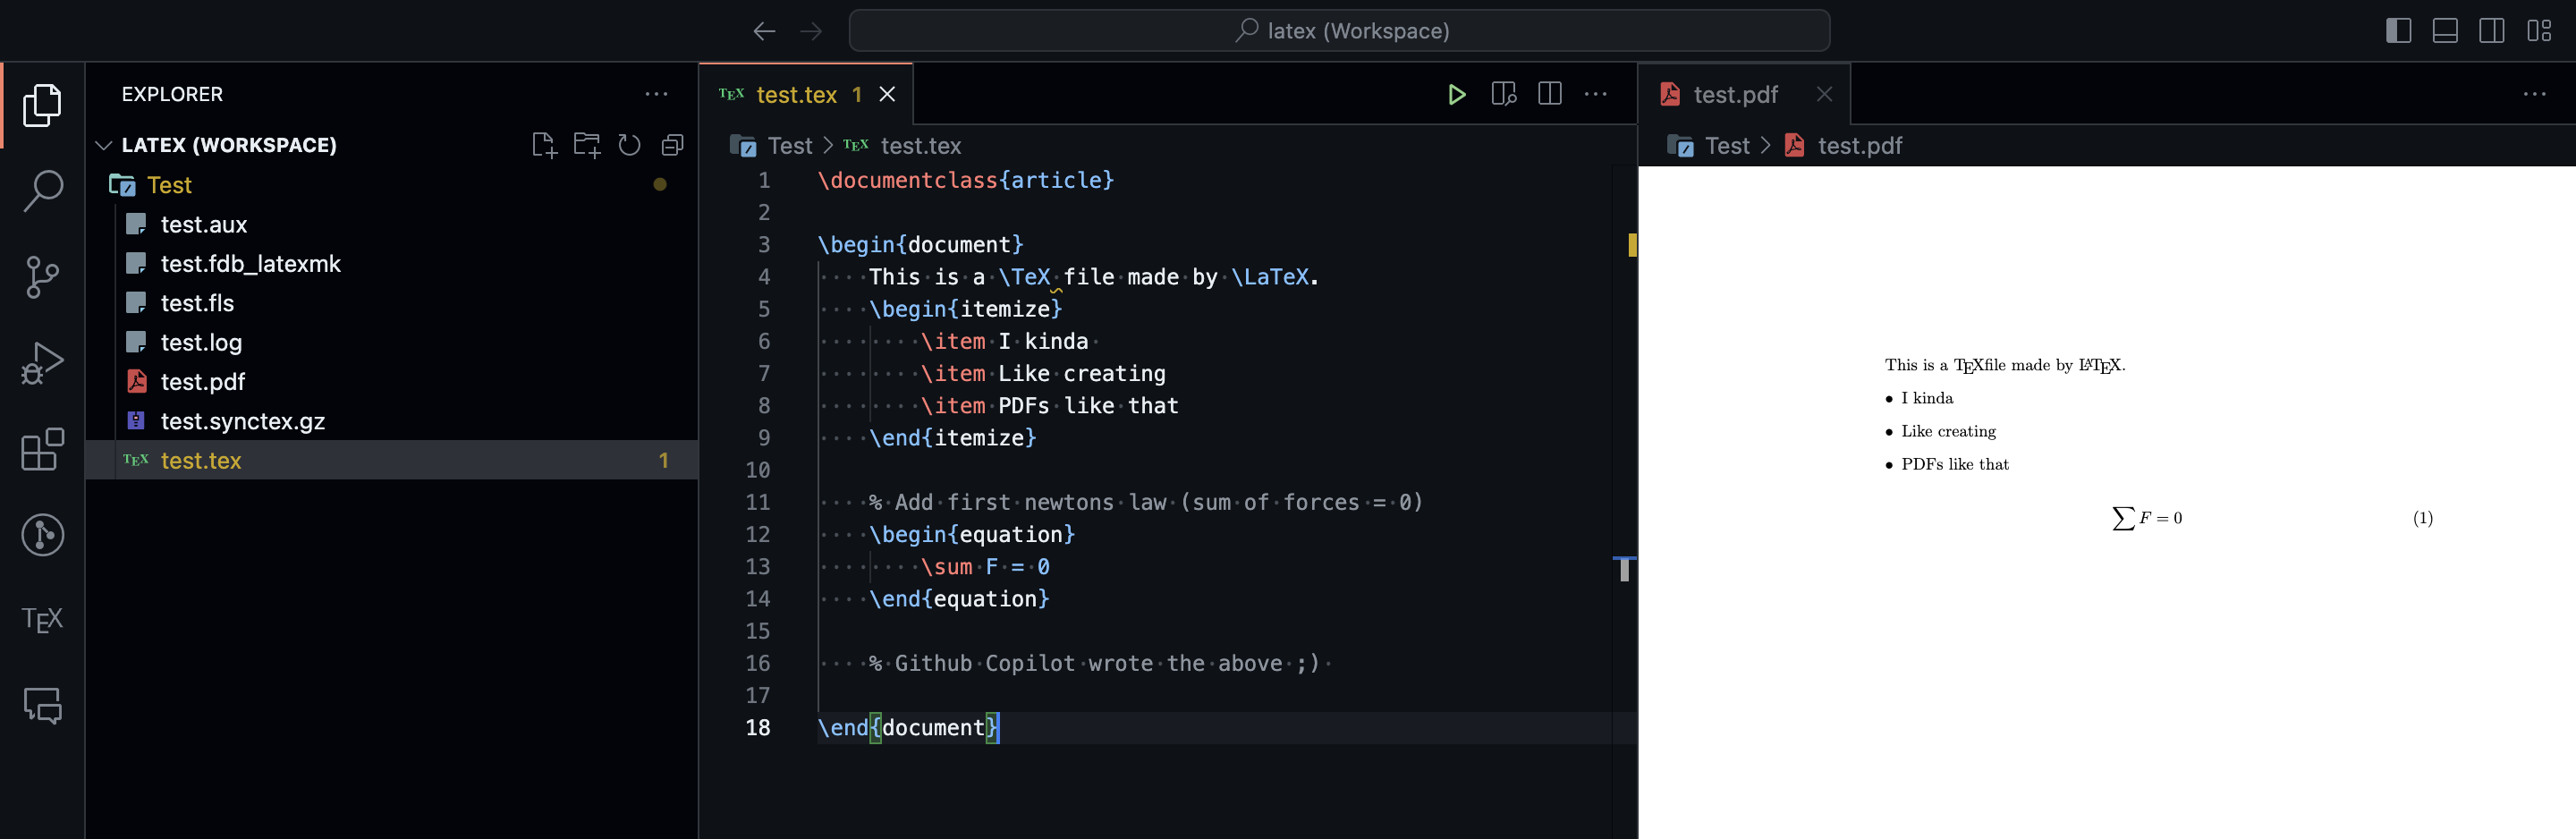
Tadaaaa! Working like a charm, and every time I save the .tex file the pdf gets generated immediately! How cool is that? You can look in the mirror and feel like an actual academic now!

⼻ Conclusion
Why is it cool to have this installation combination in your system?
- Efficiency and Productivity: VSCode enhances LaTeX's typesetting power, offering a streamlined workflow. Its integrated environment allows you to write, compile, and preview documents in one place, boosting productivity and reducing the hassle of switching apps.
- Advanced Editing Features: With features like syntax highlighting, auto-completion, and error detection, VSCode elevates the LaTeX editing experience. These tools simplify writing and debugging, making it more efficient and less prone to errors.
- Customization and Flexibility: VSCode's extensibility, with add-ons like GitHub Copilot or Grammarly, enriches LaTeX writing. It allows for a customized setup, perfect for handling complex documents in various academic and technical domains.
Keep an eye out for more posts centered around LaTeX, as I'm currently in the thick of writing my thesis. I'm confident that this journey with the incredible LaTeX and VSCode combination will uncover many exciting insights and tricks, which I can't wait to share with you.
🚀 Spread the Love & Support the Realm
Hey there, fellow Realmer! If this guide illuminated a new path in your coder/hacker journey, your support would mean a lot. Every bit of magic helps.
Spread the Love
👑 Crown & Share: If you found value in this post, please give it a crown and share it with your fellow coder/hacker enthusiasts. Spreading knowledge is what Sudorealm is all about! Fun fact the Author with the most crowns inside a realm will be crowned as the Realm King! 🤴
🆇 X Shoutout: Feeling extra grateful or have some cool feedback? Drop me a shoutout on Twitter – I'd love to hear from you! d3adR1nger on X
💬 Join our Discord Server: Join the Sudorealm Discord Server connect with fellow enthusiasts and chat about everything that fascinates you! From new blog post suggestions to seeking support on tricky tutorials. Come, share your ideas, and let's grow together! 🚀🌐
Support the Realm
🛍 Affiliate Treasures Below: Dive into the depths below the post to uncover some affiliate products I've curated just for you. It's a great way to support the realm and discover some nerdy treasures.
☕️ Coffee Driven Development: Love what you're reading? Fuel my passion for coding with a delicious cup of coffee! Every sip powers up another line of code and helps bring more exciting content your way. Support my caffeine-fueled coding adventures and let's brew up something amazing together! ☕👨💻 Join the journey and BuyMeACoffee

Thanks for being a part of our realm. Every bit of support propels our community to new horizons. Until next time, keep exploring!